

How to Organize a Tumbler Collection: 7 Easy Steps
Table of Contents
- Step 1: Take Inventory of Your Tumbler Collection
- Step 2: Sort by Size, Shape, and Handle Design
- Step 3: Declutter and Decide What to Keep
- Step 4: Tumbler Storage Ideas for Every Space
- Step 5: How to Store Tumblers in a Cabinet Without the Avalanche
- Step 6: Choosing a Tumbler Organizer for Cabinet Shelves
- Step 7: Display, Protect, and Rotate Your Collection
- Frequently Asked Questions
Last Updated: October 6, 2026
Step 1: Take Inventory of Your Tumbler Collection
Learning how to organize a tumbler collection starts with knowing exactly what you own. Most collectors underestimate their total by a wide margin.
So before you buy a single shelf or bin, count everything. Pull every tumbler out of cabinets, car cup holders, gym bags, and office desks. Line them up where you can see them all at once.
Then track the details that matter for storage:
- Size and capacity: 10-ounce cups, 20-ounce tumblers, 30-ounce, and 40-ounce styles
- Brand and model: Stanley, Yeti, and other names you collect
- Drink type: hot drinks, cold drinks, soda, wine
- Condition: daily users versus display-only pieces
A simple notebook page or phone note works fine. Group entries by size so patterns jump out fast.
Track Sizes, Brands, and Drink Types
Size drives every storage decision you'll make later. A 40-ounce Stanley Quencher H2.0 with a handle needs far more shelf depth than a 10-ounce cup. Stanley's guide to Quencher sizes breaks down how capacity affects the base width and height. Write down each measurement before you shop for storage.

Step 2: Sort by Size, Shape, and Handle Design
Sorting turns a pile into a system. Group tumblers by three traits: capacity, shape, and whether they have a handle. This makes storage simple and keeps like items together.
Start with capacity. Line up your 40-ounce tumblers, then 30-ounce, then 20-ounce, then 10-ounce cups. Within each group, separate handle cups from handle-free designs.
Standard vs. Skinny vs. 20-Ounce Tumblers
Standard tumblers have a wider body and fit standard cup holders poorly. Skinny tumblers are tall and narrow, designed for car cup holders and small hands. 20-ounce tumblers sit in the middle: enough capacity for a commute, small enough for a backpack pocket.
| Type | Typical Capacity | Best For | Storage Need |
|---|---|---|---|
| Skinny tumbler | 16-20 oz | Cup holders, commuting | Narrow shelf rows |
| Standard tumbler | 20-30 oz | All-day hydration | Medium shelf depth |
| Handle cup | 30-40 oz | Home, office, gym | Wide shelf, upright |
| Mini cup | 10 oz | Kids, espresso, wine | Small bins or risers |
Once sorted, label each group. A strip of masking tape on the shelf edge does the job.
Step 3: Declutter and Decide What to Keep
Every collection hits a tipping point where storage space runs out before shelf space does. That's when you decide what stays.
The Four-Box Sort
Set up four boxes or laundry baskets and label them: Keep, Use, Donate or Gift, and Sell. Handle one tumbler at a time and drop it in a box before you move to the next.
Here's how to route each piece:
- Keep, sentimental pieces, limited editions, discontinued colors, and anything you'd replace at full price if it disappeared
- Use, daily drivers and duplicates that are still in good shape; these go back into rotation, not into deep storage
- Donate or Gift, perfectly good tumblers you've outgrown; local shelters, school offices, and Buy Nothing groups take them year-round
- Sell, rare or retired designs with resale demand; clean them, photograph them in daylight, and list the size and model in the title
The Keep-or-Go Test
Ask four questions about each tumbler. Two or more "no" answers means it moves out of the Keep box:
- Have I used it in the past 12 months?
- Does it fit my current drink habits, hot, cold, or both?
- Would I buy it again today at full price?
- Does it have a home in the storage system I'm about to build?
What to Cut First
Some pieces are easy calls. Start here when you're stuck:
- Duplicate colors in the same capacity
- Freebie promotional cups with no personal meaning
- Tumblers that don't fit any cup holder you own
- Sets missing pieces you'll never replace
Keep sentimental pieces and rare collection additions even if they fail the use test. Display-only tumblers earn their shelf space through meaning, not mileage.
Where to Send the Extras
A few practical routes:
- Donate: domestic violence shelters, homeless outreach programs, school nurse offices, and community fridges often need insulated cups
- Gift: swap with other collectors in local or online groups, one person's duplicate is another's grail
- Sell: retired Stanley and Yeti colorways hold value; price against recent sold listings, not asking prices
- Repurpose: a retired tumbler makes a decent pen cup, makeup brush holder, or garage-shelf parts bin
Once the four boxes are sorted, photograph the Keep pile. That photo becomes the baseline for your inventory in the next step, and it's the fastest way to spot gaps in your collection later.
Step 4: Tumbler Storage Ideas for Every Space
The best tumbler storage ideas match your actual space, not a dream pantry. Measure your cabinet depth, shelf height, and door clearance before buying anything. Then pick a system that fits.
Match the setup to your situation:
- Deep kitchen cabinet: two rows per shelf with a riser between them
- Shallow cabinet: single rows, handles facing out
- Closet shelf: stackable bins by size
- Under-bed space: flat lidded bins with dividers
- Open shelving: display-forward with dust protection
Small-Space and Renter-Friendly Options
Renters can't drill into walls, and small kitchens rarely have spare cabinets. Both problems have the same fix: freestanding storage that moves with you.
Try an over-the-door shoe organizer for skinny tumblers. Use a rolling cart with tall sides for handle cups. Stack clear bins on a closet shelf. Command hooks hold lightweight cups on a wall without damage. None of these require a single screw.
NEW IN BOX, CREAM STANLEY 40oz TUMBLER B-342 →
The Container Store's guide to cabinet organization covers how to measure shelf depth correctly before you commit to a system. Ten minutes with a tape measure saves a return trip.
Step 5: How to Store Tumblers in a Cabinet Without the Avalanche
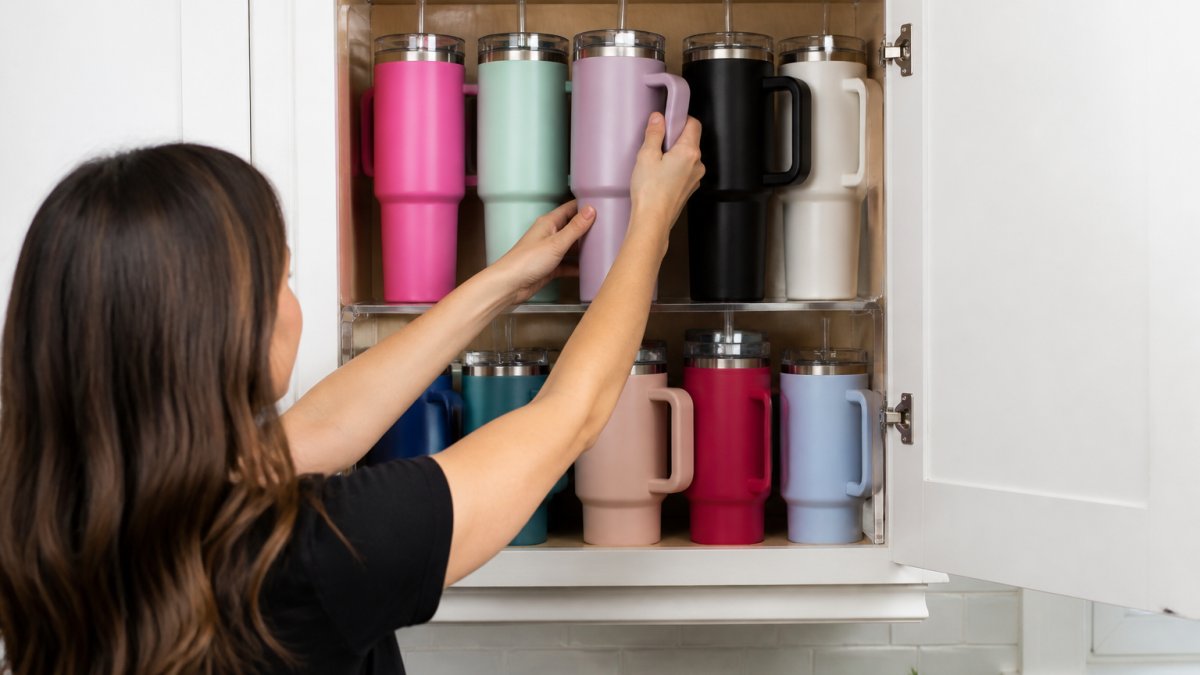
The avalanche problem has one cause: tumblers stored lying down or stacked loose. The fix is standing them upright in rows, with a riser creating a second tier. Get the geometry right and the cabinet stops fighting you every time you open the door.
Why Tumblers Slide
A riser solves the first problem by giving the back row a wall to lean against. A shelf liner solves the second. Turning handles inward or sideways solves the third.
Sizing a Riser to Your Shelf
Measure three things before you buy anything:
- Shelf depth, front edge to back wall
- Shelf height, the gap between this shelf and the one above
- Tallest tumbler, including the lid and straw
The Setup That Works
- Clear the shelf and wipe it down.
- Lay down a non-slip shelf liner cut to size.
- Place a shelf riser at the back, leaving a half-inch gap from the back wall so handles have room.
- Stand the largest tumblers on the riser, handles turned inward or sideways.
- Line smaller cups in front, tallest to shortest, so nothing blocks your view of the back row.
- Leave a two-finger gap between rows so you can grab a cup without dragging its neighbor.
Adapting the System by Cabinet Type
Deep cabinet (14 inches or more): two rows per shelf with a riser between them, back row for display pieces, front row for daily users.
Shallow cabinet (10 inches or less): single row, handles facing out, minis in a shallow riser behind them. Skip the second tier, there isn't room for it.
Tall cabinet with adjustable shelves: drop the shelf above your tallest tumbler to 13 inches and use the leftover vertical space for a stacked bin of lids and straws.
Upper cabinet over a fridge or microwave: usually too short for 40-ounce cups upright. Use it for 10-ounce minis and accessories instead.
When the Cabinet Isn't Enough
If your collection has outgrown the kitchen, the same upright-row logic transfers to a closet shelf, a pantry, or a freestanding bookcase. The rule doesn't change: upright, tiered, handles braced, non-slip underneath. What changes is the enclosure, open shelving needs dust protection, and a closet shelf needs a lip or a bin to stop cups from walking off the front edge.
Step 6: Choosing a Tumbler Organizer for Cabinet Shelves
A tumbler organizer for cabinet shelves should do three things: hold cups upright, use vertical space, and let you see what you own. Skip anything that hides your collection behind solid walls.
What to look for:
- Clear material so you can spot a color without digging
- Adjustable dividers for mixed sizes
- Non-slip base to stop sliding when the door closes
- Height clearance under the shelf above
Expandable risers beat fixed racks for mixed collections. Bottle racks work well for skinny tumblers. Wire baskets handle lids and straws. Buy one organizer first, test it, then expand.
Step 7: Display, Protect, and Rotate Your Collection
Display and protection can coexist. Rotate your daily users to the front and store rare pieces higher up or behind glass.
Protect your collection with a few habits:
Rotate seasonally. Bring tropical and bright designs forward in summer, darker colors in winter. This keeps the display fresh and gives every piece shelf time.
When a limited-edition tumbler catches your eye, our custom sourcing service can track down pieces not in our current catalog, including colors like our cream 40-ounce Stanley Quencher H2.0.
Frequently Asked Questions
How do you organize tumblers by size or brand?
Group by size first: standard 20-ounce tumblers together, then 30-ounce and 40-ounce cups, since the taller bodies tip easily when mixed with shorter ones. Within each size group, sort by brand so replacement lids and straws stay with the right cup. Keep handle cups on an outer row and handle-free skinny tumblers in the back. Label the shelf edge if multiple people share the kitchen. This simple two-layer sort means you can find any tumbler in seconds without pulling out the whole row.
Should tumblers be stored with their lids and straws?
Store each tumbler with its own lid attached and its straw tucked inside, so nothing gets mismatched. Lids left loose in a drawer collect dust and crack under pressure, and stray straws disappear fast. If shelf space is tight, keep lids on the cups and store straws upright in a small cup or jar beside the shelf. For long-term storage, leave the lid slightly off so air circulates and no odors build up inside the stainless steel.
How do you keep a tumbler collection from becoming cluttered?
Set a hard number for your collection, such as what fits on your shelves with room to spare, and follow a one-in, one-out rule once you hit it. Keep a small donation box nearby and move any cup you have not used in six months into it. Rotate seasonal or decorative tumblers to a storage bin so daily cups get prime shelf space. Reviewing the collection twice a year stops the pile from growing past what you can actually store and use.
How do you organize tumblers in a small kitchen?
Use vertical space: a shelf riser doubles cabinet capacity by stacking rows, and an over-the-door rack holds handle cups without eating counter space. A narrow rolling cart tucked beside the fridge works well for renters who cannot drill into cabinets. Keep only the tumblers you use weekly in the kitchen and store the rest in a labeled bin on a closet shelf. Rotating cups back in every few weeks keeps the collection accessible without crowding the kitchen.
A growing tumbler collection can overwhelm any cabinet, and hunting down the right storage pieces takes time most of us don't have. Tools, Handbags, and More carries drinkware and accessories alongside our custom sourcing service, so we can help you find specific items even when they aren't in our current catalog. Browse our Stanley tumblers, tell us what you're hunting for, and get your collection organized with less hassle.